Four Thousand, One Hundred Forty Skelps
Fair warning: in this here article, I will probably be making fun of mechanical engineers.
(I am, in fact, a mechanical engineer, in case that worries you.)
See, in mechanical engineering skool, we’re taught to make certain assumptions. Assumptions are necessary, of course—you can’t get anywhere with a design or analysis when you try to take every theoretical scenario into account. (What if Zeta Reticulans shoot luminiferous aether beams at our bridge?!?) Still, those assumptions are worth examining to make sure they’re reasonable.
For instance, us MechE’s usually have to assume something about the material that our gizmos are made out of.
It’s 4140 steel …
… it’s this many mega-pounds-per-pascal strong …
… it doesn’t have holes in it …
… it’s the same in every direction (isotropic, if you want the fancy term) …
… it’s the same at every spot (homogeneous, you classy lad you) …
Ask any metallurgist, though, and they’ll tell you that none of those things are universally true. None. Absolutely any of them could be wrong at any moment, and good engineers will understand what they’re doing to make sure the results are ok.
Pro tip: if your parts drawings just say “4140” in the material block, you’re in trouble.
In fact, let’s look at what “4140” actually means:
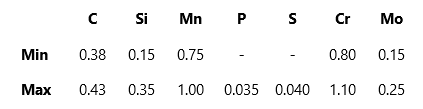
Those are the elements that make up the alloy content of AISI 4140 steel according to ASTM A29 and some other standards. The rest will be iron, mostly.
That. Is. All. It. Means.
The designation “4140” makes no promise as to the strength of your steel, or the applicability of it to any given use, or the quality or consistency of its material properties, or anything else. It only gives you the range of acceptable alloy content.
You can (though most wouldn’t) use that 4140 alloy to make every grade of steel typical in our drilling and completions work, from J55 casing to V150 drill pipe. The same 4140 alloy content can make up a shining example of modern, high-quality manufacturing and a stunningly-wrong disaster of a part.
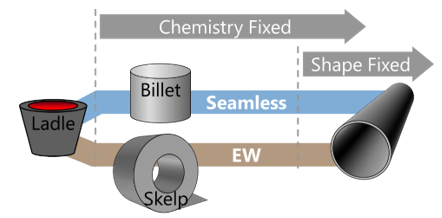
Let’s presume that we’re looking at a tube. (Not too much of a stretch in the drilling and completions world, though we do also see forgings and castings sometimes.) If we look at its baby book (look at those little booties!), we see our pipe start in the ladle.
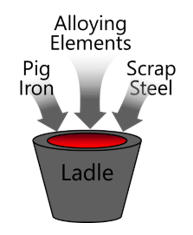
With three witches singing “double, double, toil and trouble …” around it (that might not be true), the steel manufacturer adds the correct stuff to get the alloying elements in and the impurities out. This is important for us because it represents the very last time this steel can be modified in the chemistry department. Everything else that’s going to happen will change its shape and strength, but not its alloy—it will now be 4140 forever.
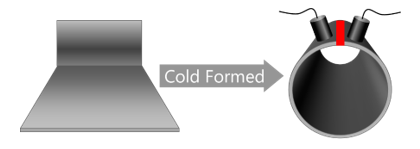
After that, the steel soup is cast into something—for our tube-making purposes, let’s call it either a billet or a long, flat plate called “skelp” which is rolled up like a Cinnabon into a “skelp reel.” (No, I don’t know where the word “skelp” came from; in terms of weird jargon in the steelmaking industry, that may not even crack the top 10.)
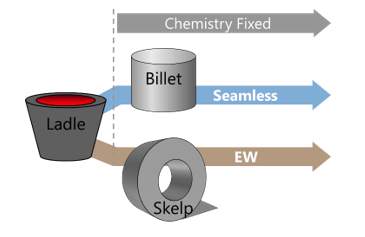
These two shapes represent two ways of making a tube. If you start with a billet, you make a tube by poking a hole in the middle using a “piercing mandrel,” then sizing the tube with rollers in a sizing line. This is called a “seamless” tube.
If you start with skelp, you have to roll it out, curl it up into a tube, then weld the edges together. In the oilfield we call this “ERW” pipe, and we’re wrong. Sorta. “ERW” stands for “Electric Resistance Welded” pipe, which is, indeed, how the welding usually happens. However, there are other possible weld processes that don’t fall under the ERW umbrella, so API adopted the broader nomenclature “EW” (Electric Welded) around a decade and a half ago. But we’re, um, slow.
Anyhoo, now we’ve got us a tube.
At this point, we’ve got another choice to make: how are we going to heat treat this thang to get the material properties we want? We have three options, and they all start by heating the pipe up to “Austenite.” Austenite is what our steel turns into when it gets hot enough, usually around 1,700°F (depends on the exact alloy), for long enough. The three options are concerned with what happens then.
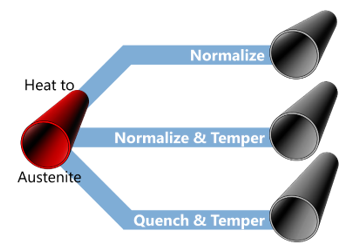
Option numero uno is to take the pipe out of the austenitizing furnace and let it cool down slowly in still air. Slowly, I said, in still air. Not with a fan blowing on it to speed things along. Not spraying the ends with water to allow your hands to move it easier. Not rolling it out onto cold pipe racks in the rain. (All failures we’ve worked on.)
That’s called “normalizing” the pipe, and it results in a particular microstructure that’s a mix of ferrite and pearlite. Look those things up at your own risk.
Option numéro deux is to normalize the pipe just like before, but then stick it back in the furnace and heat it back up. Not all the way up to the 1,700°F from before; that would be like hitting the reset button on your Nintendo. This time we’re usually around 1,000°F (again, depends on the alloy) to “temper” the pipe.
Tempering doesn’t mess with the microstructure of the pipe—it’ll still be ferrite and pearlite. Tempering causes the internal stresses in that microstructure to chill out a little bit, lowering the strength of the steel but increasing its ductility and (maybe) toughness. Because it’s an extra step in the process, normalizing & tempering may not be the most popular method out there, but it is a handy trick for metallurgists to make small adjustments to their steel when they need to.

Option nummer drei is different. This time, starting with our good friend austenite, we dunk the whole thing in cold water. (Or oil, and you might not think it’s cold, but austenite whines about it being a polar plunge.) This is called “quenching” the steel, and it results in a microstructure that’s called “martensite.”
The old metallurgy terms are helpful here: quenched steel could be called a “file hard” condition, that is, it’s as hard as a metal file. Files are hard enough to cut other pieces of metal (that’s their job), but they’re also brittle enough to snap in pieces if you want to (wear eye protection, please).
It’s a good description of martensite—it’s super hard (which means super strong), but it’s useless because it’s brittle as glass.
But! Remember how tempering works: putting the steel back in the furnace at a lower-than-austenite temperature causes the internal stresses to relax (via a few different mechanisms), lowering the (extremely high) strength of the steel and gaining back the missing ductility and toughness we need. Quenched steel has no use in our tubular goods; quenched and tempered steel is the best we can do.
In fact, everything in your drill stem—drill pipe tubes, tool joints, drill collars, HWDP (most likely)—is made from Q&T material. Any casing with a specified minimum yield strength bigger than 80 ksi is Q&T. Less than 80 ksi, it’s probably normalized or normalized and tempered. (The crossover happens at 80 in the API spec. N80 could go either way—I recommend N80Q, which is the quenched and tempered one—L80 is always Q&T.)
Without being much of a metallurgist, then (there’s all sorts of other material types that aren’t the low-alloy stuff we’re talking about here), us mekanikal types can still have a pretty good idea about the very fabric of our universe … er, tubular goods. Which is nice, because it helps explain why crap goes sideways.
For instance, remember my earlier thoughts on the failure we call “downhole heating”? That zany nonsense makes some sense when you realize that Q&T pipe that is re-Q’ed, then re-T’ed (maybe) by a lack of circulation is probably not going to work the way you think it should.
Also, you know that field welding is a bad idea, right? Q&T material is not impossible to weld, but you’ve got to pre-heat it, then watch your interpass temperatures, then have a controlled post-heat cooldown, and I promise none of that is happening on a rig floor. A tiny number of well-controlled-and-planned exceptions notwithstanding, don’t weld on tubular goods.
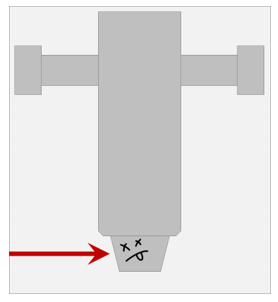
Oh! I thought of another one. Do any of your components have stuff sticking out sideways? I’m thinking of a cementing pump-in sub, where someone had drawn up and machined a sub with a Weco outlet on the side. Unfortunately, that means that the sub started as heat-treated bar stock with an OD of something like 13". The final pin diameter was about 4". There was no chance that the quenching was going to be good all the way through that massive thickness, so the fact that the pin popped right off during service wasn’t a surprise. (Well, not to me. It was a really crappy surprise to them.)
And so I end with a plea to my fellow gear heads: learn what you can about material science even if you’re not excited about it. It will help you avoid doing stupid things, especially as ever fancier material becomes available to us. (“This stuff is twice as strong as steel, and weighs a third as much! But for crying out loud, don’t pull on it that way.”)
And let me know if you figure out what “skelp” means.
